Pulse Connect (Messaging)
Pulse Connect is your all-in-one messaging hub inside MaidCentral Pulse. It lets you send and receive SMS text messages and emails with customers, leads, and staff — all in one place, without switching to your phone or a separate email app.
Looking for the Pulse Connect API, which lets outside software read and change your branch's data? See Pulse Connect API Keys.
Who Can Access This
| Role | Access Level |
|---|---|
| Administrator | Full access (view, send, mark read) |
| Office Manager | Full access (view, send, mark read) |
| Sales | Full access (view, send, mark read) |
| HR Admin | Full access (view, send, mark read) |
| Payroll Admin | Full access (view, send, mark read) |
This feature may need to be enabled for your company. If you don't see it, contact your administrator to check your feature settings.
Overview
Every cleaning business runs on communication. Customers need reminders and confirmations. Leads need prompt follow-up. Staff need quick updates. Pulse Connect brings all of those conversations into one organized inbox so nothing falls through the cracks.
You can reach Pulse Connect in three ways. First, click the mailbox icon in the top header (it shows a badge with your unread count for the branch you are working in) to open the Pulse Connect panel beside whatever page you're on. Second, a Pulse Connect panel opens the same way from contextual actions anywhere in the app, such as from a job on the schedule, a customer record, or a sales pipeline lead card. Third, an embedded message section appears directly on customer and technician detail pages so you can review their communication history without leaving that page.
Pulse Connect no longer has its own entry in the left navigation — use the mailbox icon in the header instead. The full Messages page is still available (click See All from the panel) for the two-panel conversation list and detail layout described below.
Whether you are confirming a Thursday recurring clean with a customer, following up on an estimate with a new lead, or checking in with a field technician about a job, Pulse Connect keeps the thread organized and searchable.
Texts from numbers Pulse doesn't recognize
When someone who isn't a customer, lead, or employee texts your business number (their number isn't a cell phone on any record), Pulse replies to them automatically: This number is not monitored for phone calls or text messages. Please contact [your business name] by phone at [your public phone number]. The business name and phone number come from your branch settings. Pulse answers each unknown number once a day, never answers a STOP or similar opt-out text, and does not show the stranger's text in Pulse Connect. If MaidSense Receptionist is turned on for your branch and its text channel is on, the receptionist answers instead and no automatic reply is sent.
Opening Pulse Connect Beside Your Work
Click the mailbox icon in the top header to open the Pulse Connect panel. On a desktop screen, it docks to the right side of the page by default — it pushes your current page over rather than covering it with an overlay, so you can keep an eye on both at once.
- Click the toggle in the panel's header to switch between Dock to the right and Overlay mode. Overlay mode covers the page like a traditional dialog instead of sitting beside it.
- Drag the handle on the panel's left edge to resize it.
- On a smaller screen (or in overlay mode), the panel always appears as a full overlay.
- When you open Pulse Connect from inside another panel, such as a job's details, it appears as an overlay on top of that panel so you can use it right away. The dock toggle is hidden in that case, and your saved setting is unchanged the next time you open Pulse Connect from the header.
- Opening Pulse Connect automatically closes the Work Queue panel — only one docked panel can be open at a time.
Navigating the Messages Page
Click See All in the Pulse Connect panel to open the full Messages page.
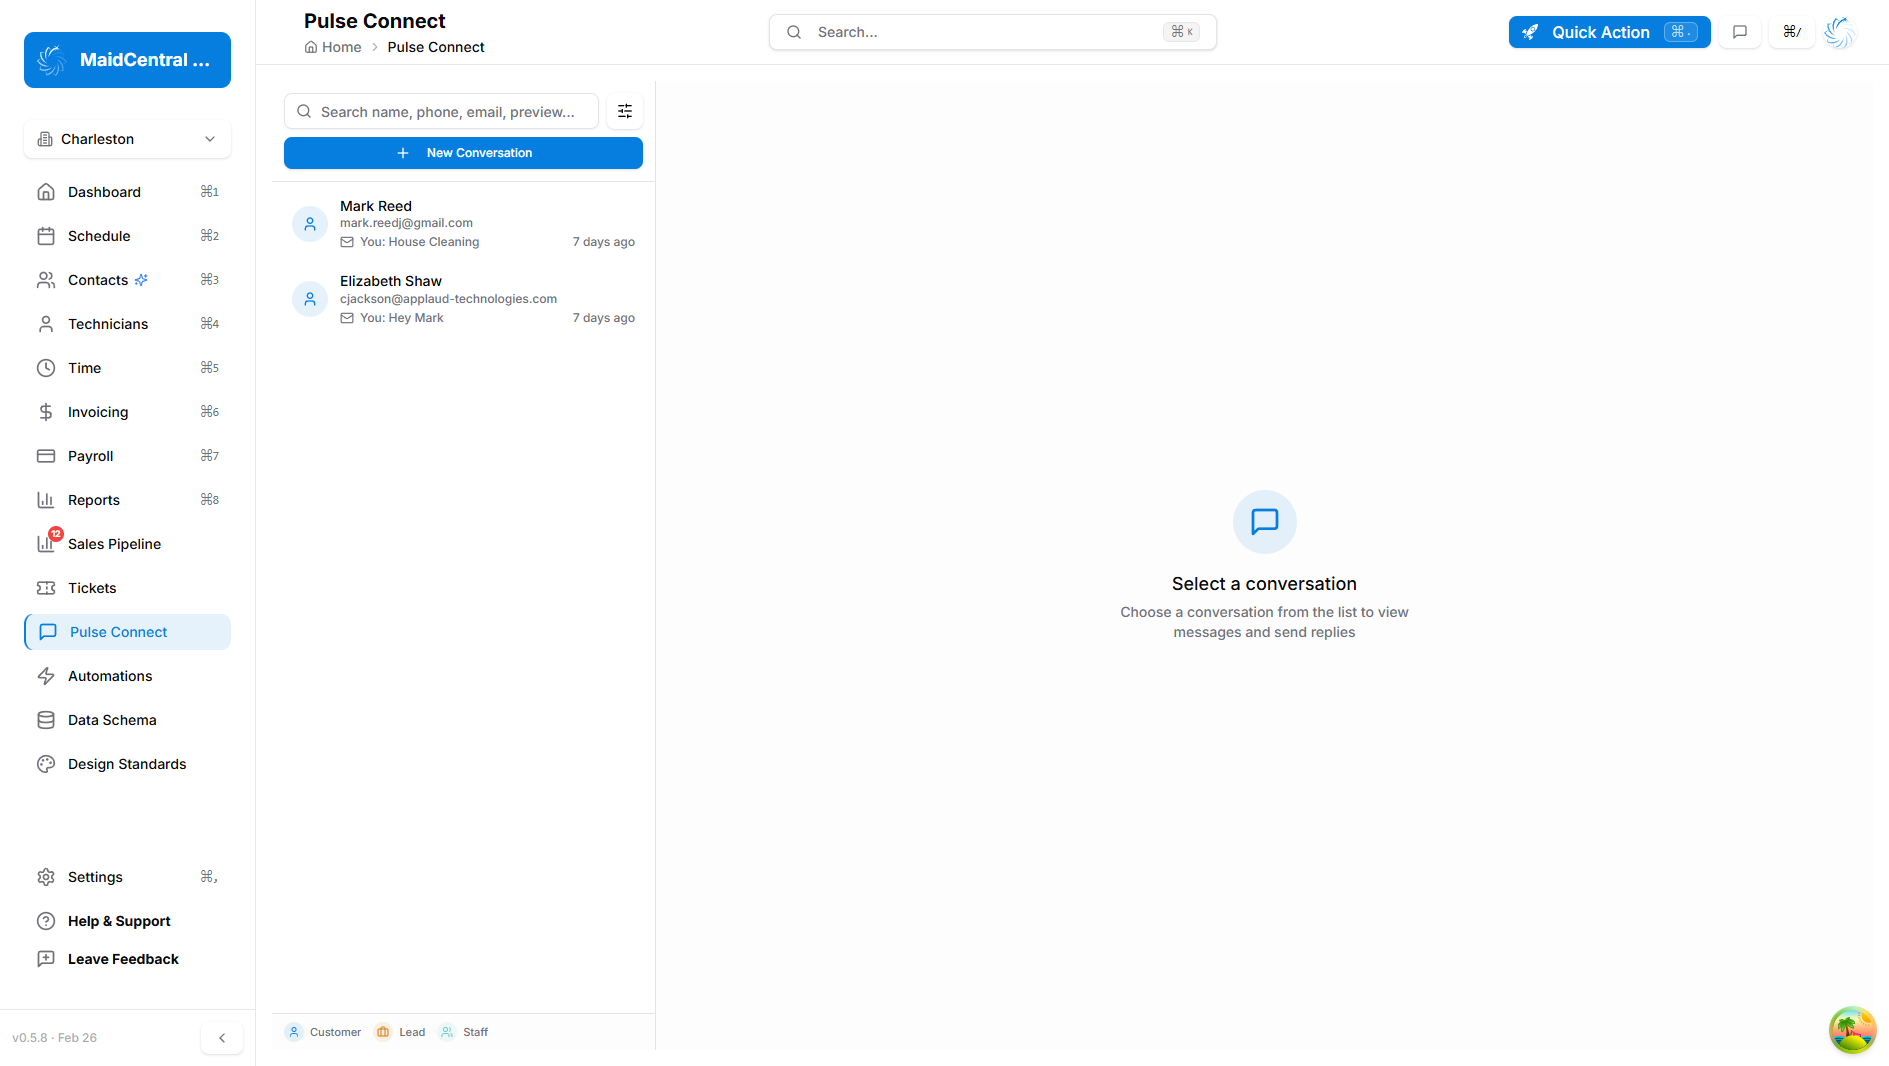
The page splits into two panels on desktop:
- Left panel — your conversation list, search bar, and filter controls
- Right panel — the active conversation with the message history and composer at the bottom
On a mobile device, the panels stack. You see the conversation list first. Tap any conversation to open it. Tap the back arrow to return to the list.
At the bottom of the conversation list, a small legend shows three contact type icons:
- A person icon (blue) — Customer
- A briefcase icon (amber) — Lead
- A people icon (purple) — Staff
These icons appear on every conversation row so you can tell at a glance who you are talking to.
Starting a New Conversation
There is no separate "new conversation" button. To message someone who does not yet have a thread, start from the Pulse Connect panel (the mailbox icon in the header) or from their record.
From the Pulse Connect panel:
- Type the person's name in the search bar at the top of the conversation list.
- Below any matching conversations, look for the Start a new conversation section. It lists up to five matching contacts who do not already have a conversation in the list. Each one is labeled Customer, Lead, or Staff so you can tell them apart.
- Select the contact. Pulse Connect looks up their phone numbers and email addresses on file. If they have more than one, choose the one you want to use.
- The conversation view opens, ready for you to compose your first message.
If the contact has no text-capable phone number or email address on file, a "No contact method" message appears. Add contact information to their record first, and then you can message them.
From a record: On a customer, lead, or technician record with no messages yet, the Pulse Connect section shows Start conversation. Click it to open a conversation with that person.
The full Messages page does not offer Start a new conversation. Use the Pulse Connect panel or the person's record instead.
Reading and Selecting Conversations
Each row in the conversation list shows:
- The contact's name (bold if there are unread messages)
- Their primary phone number or email address
- A channel icon (SMS bubble or envelope) next to the last message preview
- How long ago the last message was sent or received (for example, "7 days ago")
- An unread count badge when there are new messages
Click any conversation row to open it in the right panel. The selected conversation highlights in the list.
When you have many conversations, scroll to the bottom of the list to see a Load more conversations button. Click it to load the next batch. Scrolling near the bottom also loads more on its own.
The conversation list only includes contacts who have sent or received a text or email in the last 30 days. Load more conversations loads more threads from within that same 30-day window. It does not reach older conversations. To message someone outside that window, search for them in the Pulse Connect panel and choose them under Start a new conversation, or open Pulse Connect from their record.
Viewing a Conversation
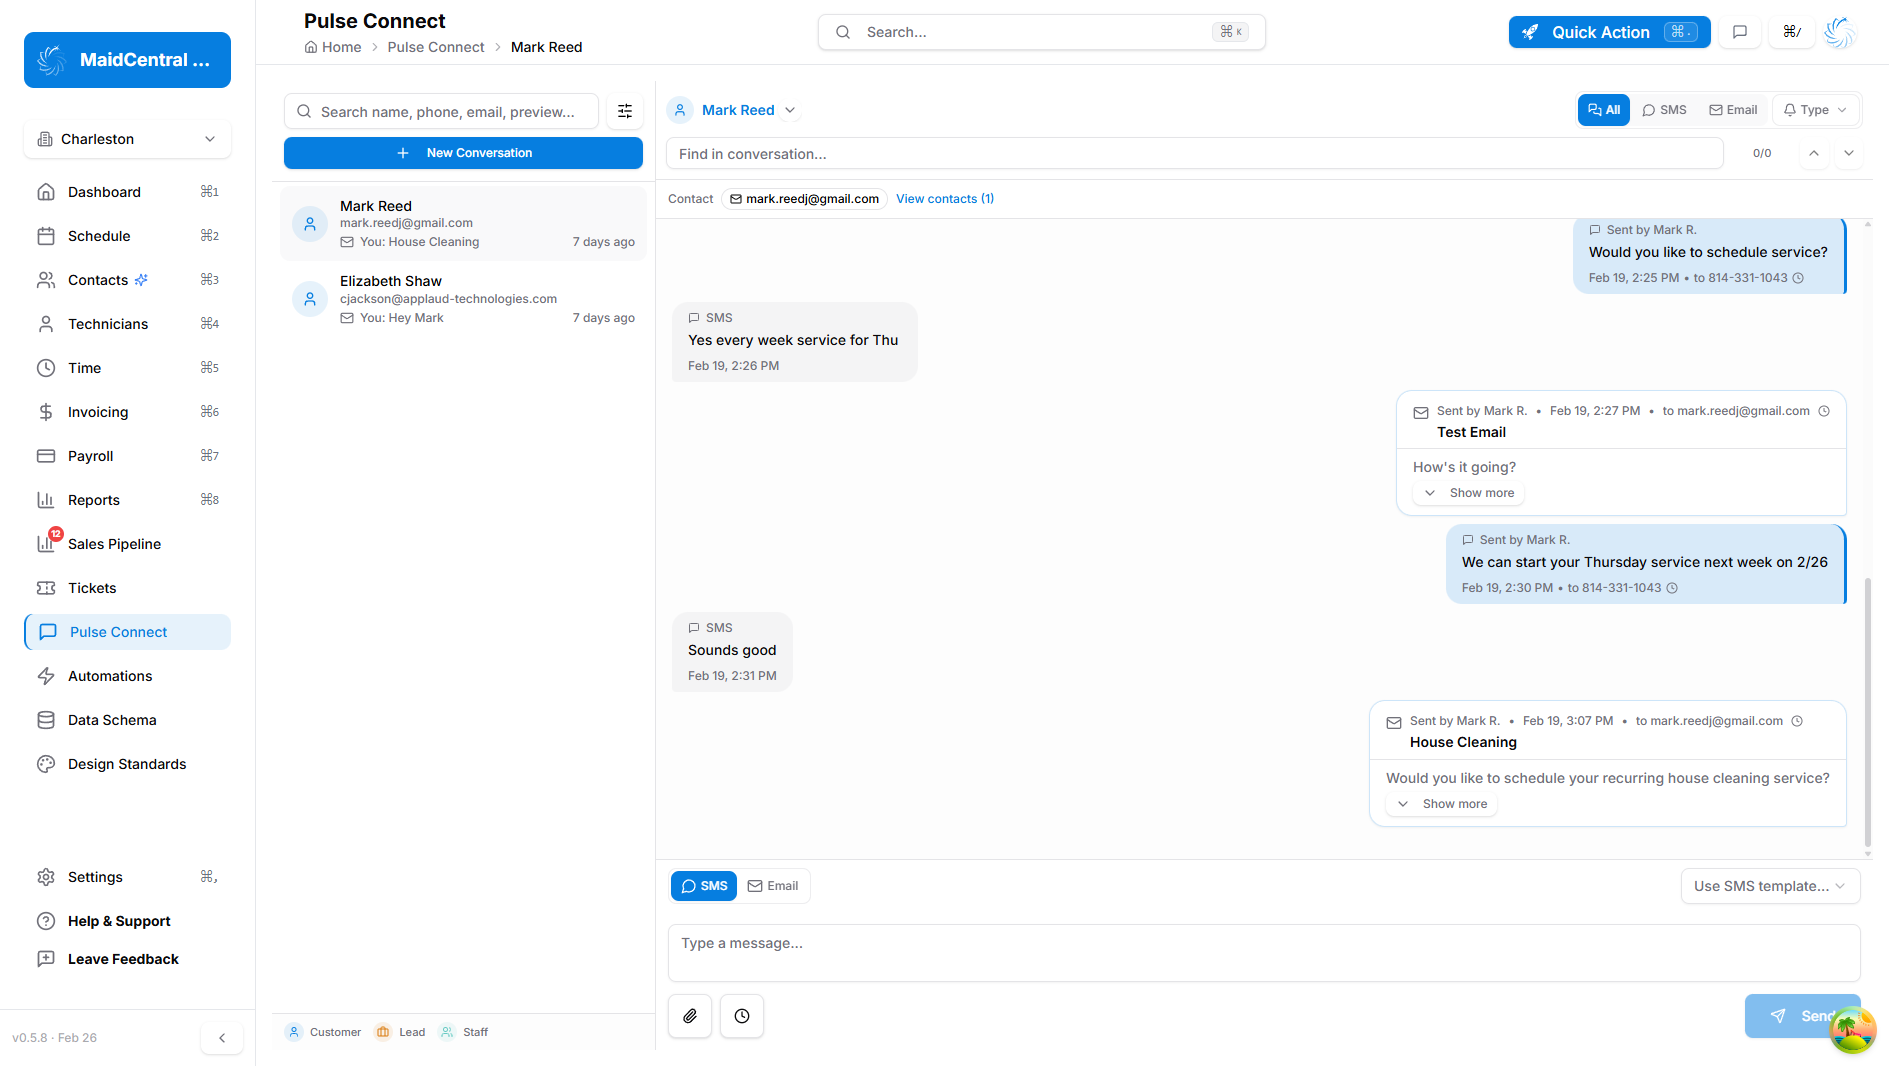
When you open a conversation, you see:
- Contact header at the top — the contact's name as a clickable link with a quick actions dropdown. Click the name to jump to their customer, lead, or technician record.
- Channel and type filter next to the contact name — switch between All, SMS, Email, and communication type views (Two-way, Notifications, Notes/Tickets) to focus on specific messages.
- Find in conversation search bar — type any word or phrase to highlight matching messages. Use the up and down arrow buttons to jump between results. Press Ctrl+F (or Cmd+F on Mac) to jump straight to this search bar.
- Contact bar below the header — shows a pill with the primary phone number or email for the conversation. If the contact has additional phone numbers or email addresses, click View contacts (N) to see all of them.
- Scheduled messages — if any messages are scheduled for future delivery, they appear in a section below the contact bar.
- Message bubbles in the main area — messages group by date. Inbound messages (from the contact) appear on the left. Outbound messages (sent by your team) appear on the right with the sender's name and delivery details.
- Message composer at the bottom — where you type and send your next message.
How Far Back a Conversation Goes
A conversation shows text messages from the last 30 days only. Emails have no cutoff — the full email history appears. This applies everywhere Pulse Connect shows a conversation: the panel, the Messages page, and the message section on customer, lead, and technician records.
For a customer, older text messages are still saved. You can find them in the Notes section of the customer's record.
Sending a Message
The composer at the bottom of every conversation lets you send SMS or email. Click the SMS or Email tab to switch between them.
Sending an SMS
- Make sure SMS is selected in the composer tabs.
- Type your message in the text box. The character count appears in the lower right corner of the input. If your message is long enough to span multiple SMS segments, the count shows how many messages will be sent (for example, "320/1600 (3 msgs)").
- Optionally select a template from the Use SMS template dropdown to fill in a pre-written message.
- Click Send or press Enter to send immediately.
To attach an image to an SMS (sent as MMS), click the paperclip icon and select an image file. Only image files (JPEG, PNG, GIF) are accepted for SMS attachments.
Sending an Email
- Click the Email tab in the composer.
- The To field pre-fills with the contact's email address. You can add more recipients or change the address.
- Click Options to expand CC, BCC, and Reply-To fields if needed.
- Enter a Subject line. The subject is required before you can send.
- Write your message in the rich text editor. You can format text, add bullet points, and more.
- Click Send to send, or press Ctrl+Enter (or Cmd+Enter on Mac) as a keyboard shortcut.
Drafting with MaidSense
When AI drafting is enabled for your company, you can use Draft with MaidSense while composing an email.
- Add your Subject line first.
- Click Draft with MaidSense next to the subject field.
- Pulse Connect generates a draft based on your subject and current context.
- Review and edit the draft before sending.
This is helpful when you need a quick first draft for follow-ups, quote reminders, or customer updates.
To attach files to an email, click the paperclip icon. You can attach up to 10 files with a combined size of 25 MB. Common file types like PDFs, Word documents, and images are all supported.
Using Message Templates
If your team has set up message templates, you can apply them in one click. In the composer, use the Use SMS template or Use email template dropdown to choose a template. The template fills in the message body and, for email templates, the subject line. You can then edit the text before sending.
Templates save time for common messages like appointment confirmations, post-service follow-ups, or estimate introductions.
Scheduling a Message for Later
You can schedule any SMS message to send automatically at a future date and time.
- Write your SMS message in the composer.
- Click the clock icon next to the paperclip.
- Choose a date and time for delivery.
- Click Set Schedule. A blue bar appears above the message input confirming the scheduled time.
- Click Schedule to confirm.
To cancel a scheduled message before it sends, click the X on the blue scheduled bar in the composer. You can also view all pending scheduled messages in the scheduled messages section above the message history.
Filtering and Searching Conversations
Searching Conversations
The search bar at the top of the conversation list searches across contact names, phone numbers, email addresses, and message preview text. Type any part of a name or message to narrow down the list.
Advanced Filters
Click the filter icon (the sliders icon) next to the search bar to expand the filter panel.
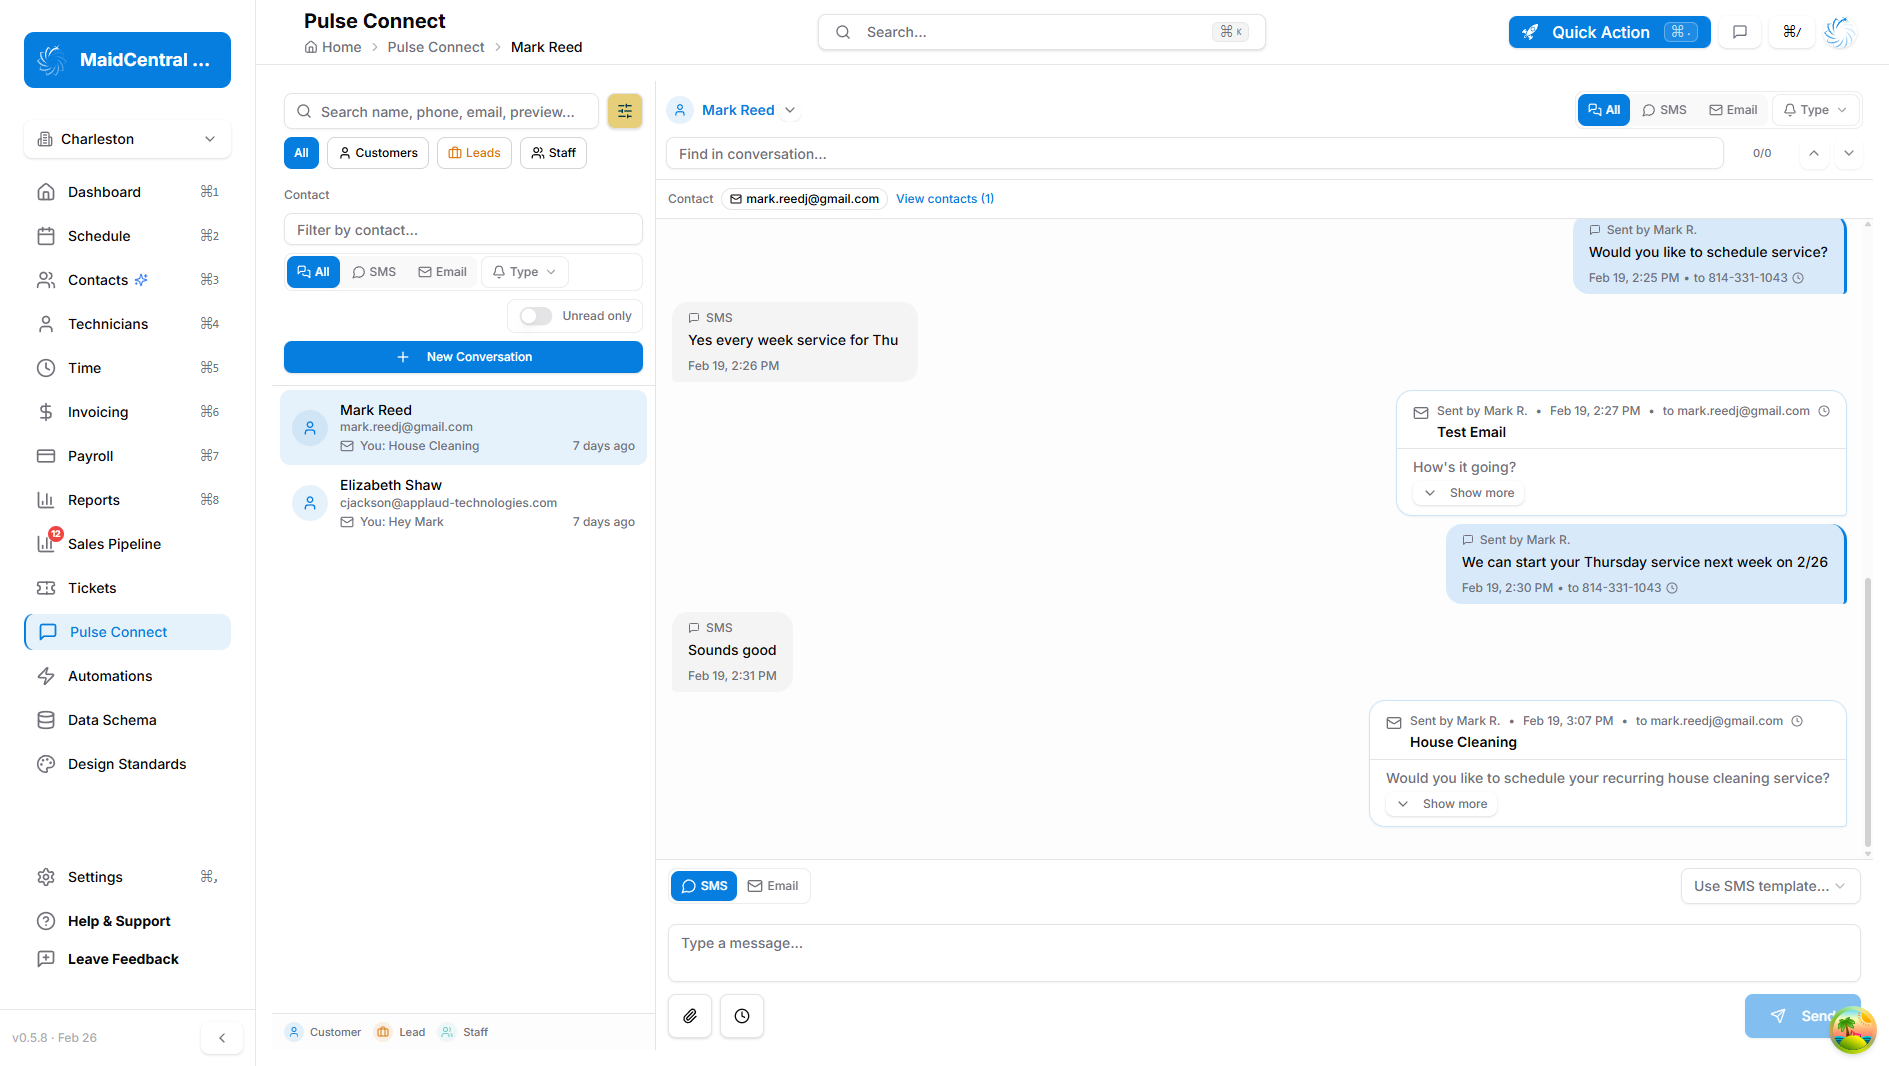
The filter panel gives you four ways to narrow your conversation list:
- Entity type — click a chip to show only Customers, Leads, or Staff conversations. The default is All.
- Contact — type a name to filter threads for a specific person. Click the X on the selected contact chip to clear this filter.
- Channel — filter by SMS, Email, or communication type (Two-way, Notifications, Notes/Tickets).
- Unread only — toggle this switch to show only conversations with unread messages.
If your company has more than one branch, the panel also has a branch dropdown. It opens on the branch you are working in. Pick more branches to add their conversations, or select Clear in the dropdown to see every branch.
When any filter is active, a small blue dot appears on the filter icon so you know filters are in use.
Filtering Within a Conversation
Inside an open conversation, the All / SMS / Email / Type filter appears in the conversation header next to the contact name. Use it to focus on one channel when a contact has a long history of both texts and emails.
Chatting with MaidSense
If your company has MaidSense enabled, a pinned MaidSense entry appears at the very top of your conversation list — above all customer and staff threads. It has a distinctive blue border and an animated MaidSense logo so it is easy to spot.
Click the MaidSense entry to open the AI assistant in the right panel. You can ask questions, get help with tasks, or look up business information without leaving the Messages page. For example, you might ask it to summarize a customer's history, suggest a reply to a complaint, or explain a feature.
When you open MaidSense from the Pulse Connect drawer (opened from a job or customer record), click the back arrow in the header to return to the conversation list.
MaidSense is separate from your regular message threads. It does not count as an unread message and it does not appear in your conversation history with customers or staff.
The MaidSense entry only appears if the MaidSense AI feature is enabled for your company. Contact your administrator if you do not see it.
Marking Messages as Read or Unread
Unread messages show a badge count on the conversation row and display the contact's name in bold. When you open a conversation and send a reply, the thread is automatically marked as read.
You can also manage read status on individual messages from within the conversation. Hover over any message bubble to reveal the options — you can mark a message as read or mark it back as unread if you want to revisit it later.
Accessing Pulse Connect From Elsewhere in the App
You do not have to navigate to the full Messages page to send a message. Pulse Connect is available from several places:
- Schedule — open a job's detail panel and look for the messaging section or a message button to open the Pulse Connect drawer for that customer.
- Customer records — the Pulse Connect section on the customer detail page shows their conversation (texts from the last 30 days, all emails) embedded directly in the record.
- Sales Pipeline — open a lead card and use the messaging option to contact that lead without leaving the pipeline view.
- Technician profiles — message a staff member directly from their profile page.
The Pulse Connect drawer has a See All button in the header that opens the full Messages page when you want more room to work. To start a fresh conversation without leaving the drawer, type the person's name in its search bar and choose them under Start a new conversation.
Tips and Best Practices
- Use templates for recurring messages. If you send the same appointment confirmation text to every new customer, create an SMS template for it. Templates are available from the composer dropdown and save you from retyping the same message every time.
- Schedule messages in advance. When you book a job a week out, schedule the reminder text right away. You do not have to remember to send it later — Pulse Connect handles it automatically.
- Filter by Unread only before your morning standup. Toggle the Unread only filter to quickly see which customers or leads replied overnight and need a response.
- Use Find in Conversation to look up details. If you remember a customer mentioned a dog or a gate code in a past message, press Ctrl+F in the conversation to search for it instantly.
- Check the contact type legend. The blue, amber, and purple icons in the conversation list help you quickly distinguish customers from leads from staff members — especially when their names look similar.
- Use CC and BCC for team transparency. When sending important emails, CC your office manager or supervisor so there is a shared record of the communication.
Troubleshooting
The contact I searched for does not appear under Start a new conversation
What you see: You search for a customer's name but they do not show up under Start a new conversation.
Solution: Make sure you are searching in the Pulse Connect panel, not the full Messages page, which does not offer this section. Check the spelling of their name. If they already have a conversation in the list, they appear as that conversation instead. Only the top five matches are listed, so type more of the name to narrow the results. If they are a new contact added very recently, try refreshing the page and searching again.
Can I see text history for a phone number that isn't a saved contact?
Solution: No. If the number isn't saved on a contact, Pulse has nowhere to store those messages.
I selected a contact but got a "No contact method" error
What you see: After choosing a contact under Start a new conversation, an error appears saying the contact has no text-capable phone or email on file.
Solution: Go to that customer's, lead's, or technician's record and add a phone number or email address. Then come back to Pulse Connect and start the conversation.
My scheduled message did not send
What you see: A message was scheduled but it was not delivered at the set time.
Solution: Check whether the message still appears in the scheduled messages section at the top of the conversation. If the send time has passed and the message is still listed, contact your administrator. The scheduled time is based on your company's configured timezone, so confirm the correct time was selected.
The SMS character count shows multiple messages
What you see: The composer shows something like "320/1600 (3 msgs)" even though your message does not look that long.
Solution: This is normal. Long SMS messages are automatically split into multiple segments by your phone carrier. Each standard segment is 160 characters. If your message contains special characters or emoji, segments shrink to 70 characters each. The total message still arrives as one continuous text for most recipients, but each segment may be billed separately by your SMS provider.
I cannot see the Email tab in the composer
What you see: Only the SMS option is available and there is no Email tab.
Solution: The Email tab only appears when the contact has an email address on file. Go to their record and add an email address, then return to the conversation.
Related Articles
- Managing Customers - Add and update customer contact information
- Schedule Overview - Learn how to access Pulse Connect from the schedule